How to install Windows 11 on almost any unsupported PC
Windows 11 is Microsoft’s brand-new operating system. Leaked on June 15th and officially announced on June 24th, the first Windows 11 preview build became available to users on June 28th. Besides having a new look and feel, it also comes with some (very) recent minimum hardware requirements to run.
Microsoft is allowing some unsupported computers to install and run the developer previews, but those computers had to be enrolled in the Dev Channel ring of the Windows Insider Program before the end of June 24th to qualify. If you didn’t manage to enroll before then and your computer is unsupported, you won’t be able to (officially) receive the previews of Windows 11.
Luckily, there are plenty of unofficial ways to update your unsupported computer to Windows 11.
Navigate this tutorial:
- Method 1: Upgrade to Windows 11 by manually enrolling in the Dev Channel
- Method 2: Upgrade to Windows 11 by enrolling in the Dev Channel using a script
- Method 3: Upgrade or Clean Install Windows 11 by creating a hybrid ISO
Method 1: Upgrade to Windows 11 by manually enrolling in the Dev Channel
If you missed the June 24th cut-off date for enrolling in the Dev Channel, you’re not out of luck just yet. Unsupported computers only show the option to enroll in the Release Preview Channel, but it’s still possible to change that to get Windows 11. Here’s how.
Make sure you’re enrolled in the Release Preview Channel
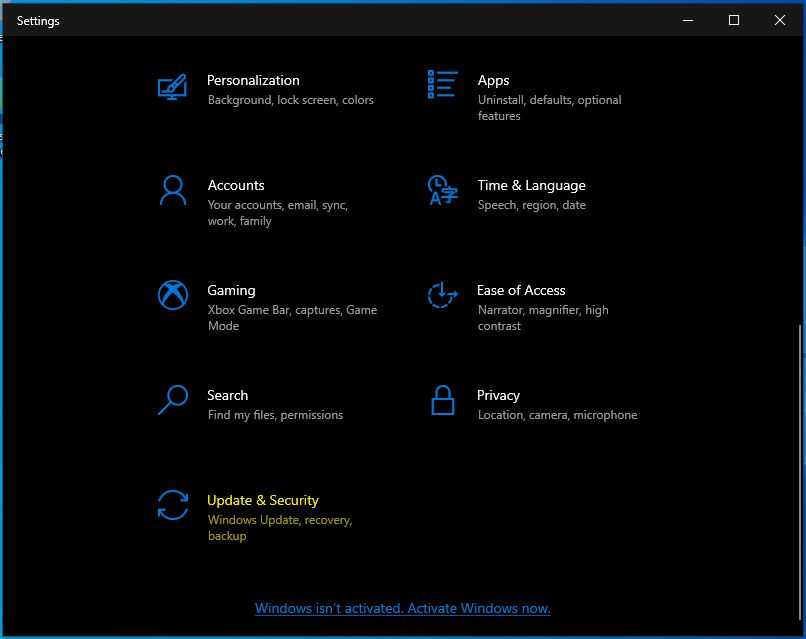
- Open the Settings app.
- Navigate to Update & security and select Windows Insider Program in the sidebar.
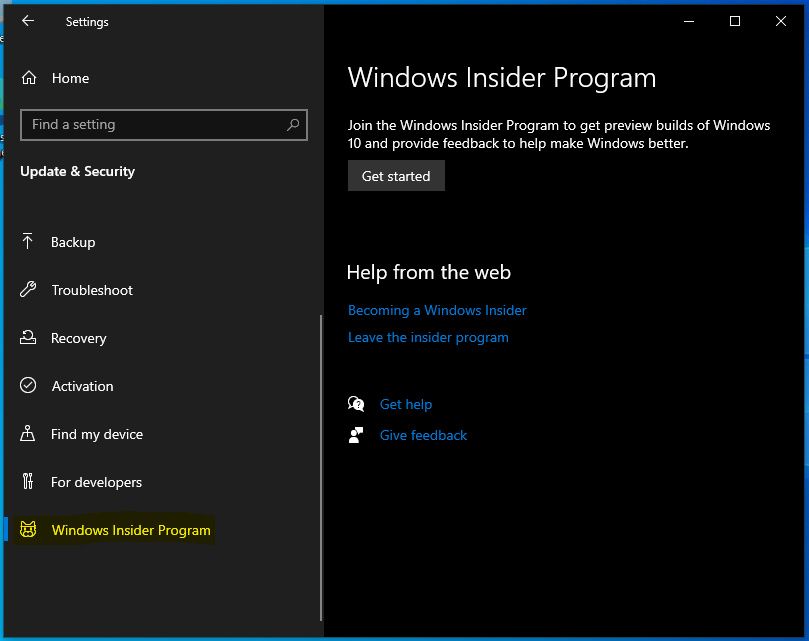
- Let the page load, and then click the Get started button.

- If prompted, link your Microsoft account.
- On the Pick your Insider settings page, select Release Preview Channel and click Confirm.

- Confirm that you do actually want to be in the Insider Program and reboot when prompted.
- Let your computer restart and then log back in.
Enroll in the Dev Channel
- Open the Start Menu and type regedit.
- The first result should be Registry Editor. Click on that to open it. Confirm any permission prompts.

- Once Registry Editor is open, you’ll see a bunch of stuff in the sidebar. Use that to navigate to HKEY_LOCAL_MACHINE\SOFTWARE\Microsoft\WindowsSelfHost\Applicability. You’ll see a few things show up on the right.

- Now you’ll need to create or change a few values, depending on what’s already there.
- If you see BranchName, double-click it and enter Dev in the value field.
- If you see ContentType, double-click it and enter Mainline in the value field.
- If you see Ring, double-click it and enter External.

- If any of the above values don’t exist, make sure you’re properly enrolled in the Insider Program and try again.
- Reboot your computer.
- Go to Settings >> Update & security >> Windows Insider Program and you should now be in the Dev Preview ring.
If everything went well, you should now be able to check for updates and install the latest Windows 11 preview.
Method 2: Upgrade to Windows 11 by enrolling in the Dev Channel using a script
If the previous method didn’t work for you, either because you don’t have a Microsoft account signed in, or because Windows reverted to the Release Preview channel, try this method.
Download the script
- Go to the GitHub page where the OfflineInsiderEnroll script is hosted.
- Right-click the Raw button and choose Save link as….
- Select a location for it to download (e.g., Downloads).
- Click Save and let it download.
Run the script
- Open the File Explorer and navigate to where you downloaded the script.
- Right click it and choose Run as administrator. Confirm any permission prompts.

- A Command Prompt window should come up with some options.

- Choose option 1: Enroll to Dev Channel. (Type in “1” and hit Enter.)
- The script will let you know when it’s done. Press any key and the Command Prompt will close.
- Go to Settings >> Update & security >> Windows Insider Program and you should see something similar to the following.

- Check for updates and you should see the option to upgrade to Windows 11.

Method 3: Upgrade or Clean Install Windows 11 by creating a hybrid ISO
If the previous methods didn’t work for you (or you need to perform a clean install), use this method.
The requirements verification for Windows 11 is currently only built into the initial setup and a post-install program known as the Out of Box Experience (OOBE for short). The OOBE usually only runs on clean installs, so if you’re upgrading, you only need to worry about bypassing the initial verification.
And that initial bypass is actually pretty simple: use the Windows 10 installer to install the Windows 11 files. How? By creating a hybrid ISO. Here’s how to do that.
Check your boot mode
- Open the Start Menu and type msinfo. The first result should be System Information. Open that.
- Once System Information opens, make sure System Summary is selected in the sidebar.
- In the right pane, look for the BIOS Mode item. Write down what it says.

Create a hybrid installer
- Download the latest Windows 10 Insider ISO available. You can get build 21354 directly from Microsoft with an Insider account, or you can use UUP Dump to create your own build 21390 ISO for your architecture.
- Download the latest Windows 11 Insider ISO available. Microsoft doesn’t currently have one available, but UUP Dump can create one for you. If UUP Dump isn’t working properly, there are plenty of premade ISOs available on sites like Reddit.
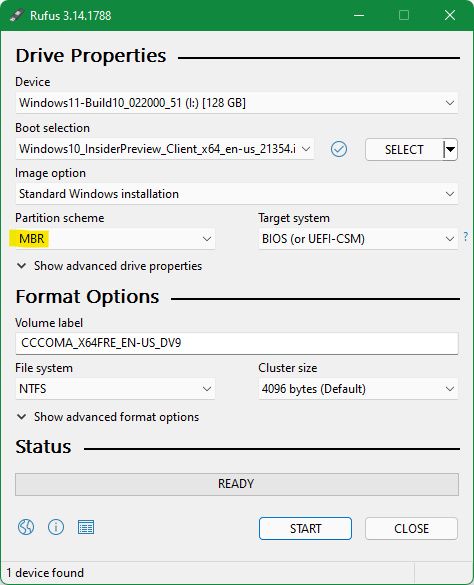
- Use a program like Rufus to burn the Windows 10 ISO to a USB drive. If your boot mode is Legacy, use an MBR partition scheme. If your boot mode is UEFI, use GPT.

- Once the Windows 10 ISO is burned, open the USB drive in the File Explorer. Navigate to the sources folder inside.
- Scroll down until you see either install.wim or install.esd. Note down the extension (wim or esd).

- Rename the file to something like install1.wim or install1.esd.
- Navigate to the Windows 11 ISO. Right click it, and choose Mount.
- After a few seconds, you’ll see a “DVD Drive” pop up in the File Explorer. Open that “drive” and navigate to the sources folder.
- Scroll down until you find either install.wim or install.esd. If the extension here matches what you noted before, you’re good to go. There’s a chance that your Windows 11 ISO will have an install.wim while your Windows 10 ISO will be using install.esd. Follow the section below if so.
- Copy the install file from the Windows 11 “DVD Drive” sources folder to the Windows 10 USB drive sources folder. Again, only do this step if you have matching extensions. Otherwise, you’ll need to convert the Windows 11 install file to the correct type first.
Now you should have an installer that thinks it’s for Windows 10, but will actually install Windows 11.
Converting WIM to ESD
- Copy the Windows 11 install.wim file to somewhere safe, like the desktop.
- Open a Command Prompt as an administrator. (Search for “CMD” in the Start Menu, right click “Command Prompt” and choose “Run as administrator”.)
- In the Command Prompt window, enter dism /Get-WimInfo /WimFile:C:\Path\To\install.wim. Change the path to where the WIM actually is. For example E:\Downloads\OSes\install.wim. If your path has spaces, enclose the entire path in double quotes.
- This will give you a list of editions contained in the WIM, each with its own index. Choose the edition you want and remember its index.

- Next, run dism /Export-Image /SourceImageFile:E:\Downloads\OSes\install.wim /SourceIndex:INDEX /DestinationImageFile:E:\Downloads\OSes\install.esd /Compress:recovery /CheckIntegrity. Remember to replace the SourceImageFile path with the actual path to your install.wim. Do the same for the DestinationImageFile path. Finally, replace INDEX with the index you chose above.

- That command will take a while (and use a lot of CPU), but eventually you’ll have an ESD that you can copy to your USB drive.

Option 1: Use the installer to upgrade to Windows 11
- Open the USB Drive in the File Explorer.
- Double-click the setup.exe file (there may not be a .exe extension shown depending on your settings).
- Windows will guide you through upgrading.
- Once the upgrade process is complete (it will take a while), you’ll have Windows 11 running.
Option 2: Use the installer to clean install Windows 11
- Boot from the USB drive.
- Go through the setup like you normally would.
- When the setup prompts you to reboot, let it.
- Windows will now boot into the initial post-install setup. It’s going to attempt to set up your computer, and may reboot a few times.
If the setup succeeds, you should now see the initial setup guide screen, and you’re good to go.

If the setup fails, you’ll need to do some extra steps.
- Reboot back to the USB drive setup.
- Once the Windows setup reaches the initial screen, press the Shift and F10 keys at the same time. This should open a Command Prompt window.

- Inside the Command Prompt, type in regedit and hit Enter. The Registry Editor should now open.
- Select HKEY_LOCAL_MACHINE in the sidebar.
- Go to the File menu and select Load Hive….
- In the file picker window that opens, navigate to This PC and find your operating system drive. Note: it might not be the C: drive! Check the size and contents to make sure you have the right one. For this tutorial, the operating system drive will be the C: drive, so make sure you replace mentions of that if needed.
- Navigate to C:\Windows\System32\config.
- Double-click SYSTEM. When asked for a “Key Name” enter SYSTEM1 and press OK.

- Do the same process again, but this time load SOFTWARE and name it SOFTWARE1.
- Back in Registry Editor, navigate to HKEY_LOCAL_MACHINE\SYSTEM1\Setup.
- Make sure the Data for CmdLine is blank (double-click, remove all text, hit OK).
- Make sure OOBEInProgress is set to 0.
- Make sure RestartSetup is set to 0.
- Make sure SetupPhase is set to 0.
- Make sure SetupType is set to 0.
- Make sure SystemSetupInProgress is set to 0.
- The end result should look similar to the following.

- Now navigate to HKEY_LOCAL_MACHINE\SOFTWARE1\Microsoft\Windows\CurrentVersion\OOBE.
- Right-click in the right pane and choose New > DWORD. Name it SkipMachineOOBE and set the data to 1.
- Right-click in the right pane and choose New > DWORD. Name it SkipUserOOBE and set the data to 1.

- Close Registry Editor.
Create a user account
Since these steps disabled the initial post-install setup for Windows, you’ll need to create an initial user account manually. Here’s how to do that.
- In the Command Prompt window, enter copy C:\Windows\System32\Utilman.exe C:\, where C: is your operating system drive.
- Next, enter copy /y C:\Windows\System32\cmd.exe C:\Windows\System32\Utilman.exe. This will replace the Utilman program with the Command Prompt.
- Reboot back into Windows. Enter wpeutil reboot in the Command Prompt window and let Windows boot up normally.
- On the login screen, your only option should be “Other User”.
- In the bottom right, click the Accessibility icon. A Command Prompt window should open.
- In the Command Prompt, enter net user /add USERNAME PASSWORD. Replace USERNAME and PASSWORD with your desired username and password.
- Next, enter net localgroup administrators USERNAME /add, where USERNAME is the username you chose in the step before.
- The user account won’t show up before you reboot.
- Reboot your computer and boot from the USB drive again.
- Press Shift and F10 again to open the command prompt again.
- Enter copy /y C:\Utilman.exe C:\Windows\System32\Utilman.exe to restore the original program.
- Reboot into Windows and you should now be able to log in and set things up. You can safely delete the Utilman.exe file from C:\ now.
Conclusion
And that’s how you can install Windows 11 on unsupported hardware. These three methods aren’t all of the possible ways to get Windows 11 installed, but they’re probably the easiest (even the third one). Of course, there’s no guarantee that this tutorial will continue to apply to Windows 11 as new previews and the final version are released.
For now, though, I can personally say that at least the third method works perfectly when performing a clean install.
I finally got Windows 11 22000.51 running on an MBR system with TPM 1.2 and a very unsupported CPU. It took me all day because I tried to do it the hard way and failed. pic.twitter.com/IFcGY5p6JI
— Zachary Wander (@Wander1236) July 1, 2021
Even with this workaround, if you’re able to, consider buying a new computer that’s officially supported by Windows 11. While Windows 10 will continue to be supported for another 4 years or so, eventually you’re going to need Windows 11 for new features and better security.
The post How to install Windows 11 on almost any unsupported PC appeared first on xda-developers.
from xda-developers https://ift.tt/3hFUBfc
via IFTTT
No comments: